I'm a college student with a very small budget for hobbies, so I'm always looking for ways to save money.
When it comes to stitching panoramas, I've learned that you don't need expensive software or equipment to
have fun and get great results. With this tutorial, I hope to give some tips and point you in the right
direction when want to do your own panoramas.
With this tutorial, I'm going to walk you through how I made this panorama:
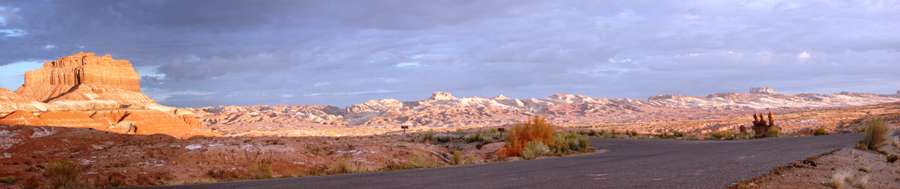
Click on the picture to see the full version.
This is a pano of the San Rafael Swell
taken near Goblin Valley just after sunrise. This pano is a
composite of 5 pictures. I used an
Olympus 3030z, a 3 megapixel camera I've
had since 2001. It's not a fancy camera, but has the manual controls I need. I set the camera on top of
a trash can to steady it.
Here's what the 5 images look like when they're just arranged.

The Software
Sure you can go out and buy expensive software to do your panos for you, but why not try the free and open-source
stuff? Here's what you'll need:
- Hugin. The latest version is .7 (still in beta testing),
which has many great new features over previous versions. It does a lot of the work of stitching
automatically. You can download Hugin for Linux, Windows, and OS X.
- Autopano-sift. Hugin works on top
of a software library called PanoramaTools, which requires that control points be specified between two
adjacent pictures. Control points are points that are the same in both images. You can specify your own
control points in Hugin (a drudgery), or you can let software do it for you! This is what Autopano-sift
does for you. However, sometimes difficult pictures need more control points than what Autopano-sift detects
and you'll need to specify your own. Sometimes, Autopano-sift finds too many control points in one concentrated
area and you'll need to specify control points that are more spread out. You can download a Windows installer
or download the source and compile it for Linux.
- Smartblend. I use this instead of
Enblend because I've noticed better results with it and it
runs faster. This may be because I haven't mastered all the options with Enblend. Download the latest
beta version (1.2.3 beta 0 as of 7 Jan '07). Smartblend is a Windows-only command line utility. If you don't know what that
means, you soon will. Basically it means you'll have to do some typing instead of clicking to use it.
Smartblend is Windows only, but Enblend works on Windows, Linux, and OS X.
Smartblend comes just as a zip file. This means there's no graphical installer that places the program in
some default location. You need to decide where you want to place it - just remember where you put it.
For example, I put it in C:\Program Files\panorama\smarblend_1_2_3b0\.
- Your favorite image editing program. I use a couple different programs. I use Microsoft Office Picture
Manager, which came included in Microsoft Office because it has, in my opinion, the best cropping utility
of any image editing program I've used. It also has an "Auto Correct" feature that works most of the time, but not
always. Another program I use is The Gimp, more specifically, I use a
variant of it called Gimpshop, because it looks a little more
like Photoshop. I use it because it supports layers, you can make your own custom brushes, does many of the
things Photoshop does, and most importantly, it's free! The important features you'll need in and image editing
program are the ability to crop and adjust colors/saturation. You can run Gimp or Gimpshop in Windows, Linux, and OS X.
- If your goal is to make a 360 degree panorama, you'll need
Pano2QTVR and Quicktime.
Download and install Quicktime first if you don't already have it. There is a Pro version of Pano2QTVR that you
can buy. It adds some nice features, but I find the free version works just fine.
That should be all the software you'll need. There are, of course, many other software alternatives. I use these
because they give me the most control over the panoramas, give the best results, and they're absolutely free! They also take much more time
than some of the alternatives. If I quickly want to see how a pano will turn out, I will often use
Autostitch, which does everything automatically.
It usually gives good results, but you have no control over it and sometimes it doesn't work that great. It is for Windows only.
The Workflow
Overview:
We're going to use Hugin and Autopano-sift to rotate, stretch, and align the images. Our input
will be the original pictures (either JPG or TIF) and the output will be one TIF file for each input file. These
TIFs will be as wide and as tall as the entire panorama, but will only contain the data for one picture, properly
aligned according to its neighbors. We will then use Smartblend to blend the TIFs into one. Next we'll use any
image editor to crop the output of Smartblend and adjust colors/contrast, etc. Finally, if you're doing a 360 degree
pano, you'll use Pano2QTVR.
Step 1:
Start up Hugin and load your images. I used Hugin version .7 beta 1 for this tutorial.
Future version may look different but will probably look really similar.
Hugin should look something like this:
 Click on the Load Images button. Browse to and select your images. You can use your mouse to
drag a box around them, use the CTRL button to select individual images, or use the SHIFT button to select a
consecutive block of images. (Quick Tip: If you're hunting through a folder with lots of pictures, it's often quicker to
view the pictures as thumbnails. Click on this little icon:
Click on the Load Images button. Browse to and select your images. You can use your mouse to
drag a box around them, use the CTRL button to select individual images, or use the SHIFT button to select a
consecutive block of images. (Quick Tip: If you're hunting through a folder with lots of pictures, it's often quicker to
view the pictures as thumbnails. Click on this little icon:  and select
Thumbnails.) Alternatively, you can drag and drop your images into the white box on the "Images" tab.
and select
Thumbnails.) Alternatively, you can drag and drop your images into the white box on the "Images" tab.
If you have an older digital camera, as I do in this tutorial, you may get a screen that asks you to enter the
crop factor of the image. Newer cameras are more likely to already have this and this next image will never appear.

Basically this number is used to convert the focal length used to take the picture into
a 35 mm equivalent. This information is used to correct lens barrel distortion, field of view of each picture
and I don't know what else. Finding it wasn't very hard. As the instructions say, you just need to find the
diagonal length of your image sensor (in mm) and divide 43.3 by that number. I found out through
dpreview.com that my image sensor is 7.18 x 5.32 mm. A simple use of the
Pythagorean Theorem tells me my image sensor is
8.94 mm in diagonal. 43.3/8.94 = 4.84. (Quick Tip: To bring up the calculator in Windows, using only the
keyboard: press the "Windows" button + R, this brings up the Run Command dialog box. Then type "calc" (without the
quotes) and press enter. It's faster than using your mouse!)
Step 2:
Click the Align button. If this is the first time you've used Hugin, it will ask you where to
find autopano so it can find all the control points for it. If you just did the default installation, the default
location is C:\Program Files\Autopano-SIFT-2.3\autopano-win32.exe Make sure you select autopano-win32.exe and
click Open. Hugin remembers this location after you set it.
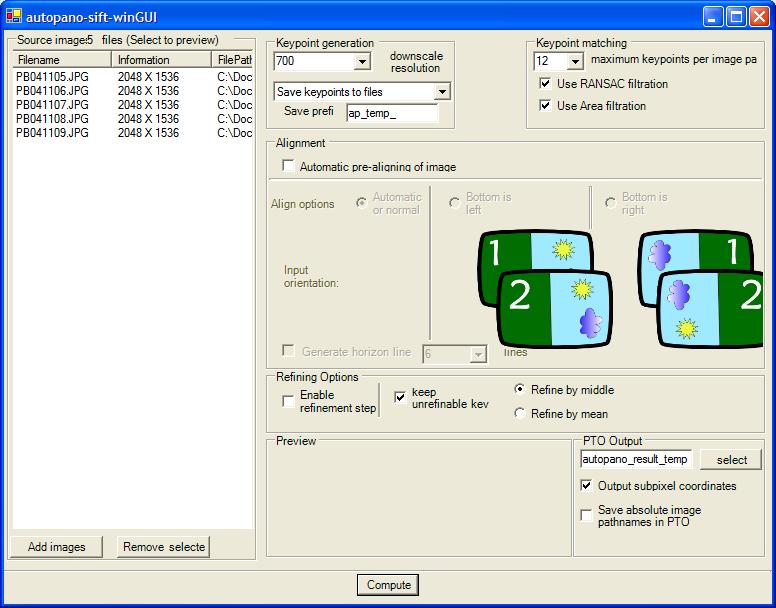
You should now see a window like the following. There are a lot of options, but I usually just click Compute
and it works just fine. So do that. Just click compute.
You'll probably see a little warning come up about absolute path names. Just click Yes. Now, autopano does its
thing and it is very memory/processor intensive. Here's a little Quick Tip for Windows to make it go a
little faster. You can use the Task Manager to change the priority of a program so it gets more of the CPU's
time. An operating system is constantly juggling and switching between different programs or processes. Some are
higher priority than others. If you want to make computation-intensive program go a little faster, you just need
to give it a higher priority. Open the Task Manager by pressing CTRL-SHIFT-ESC. Click on the Processes tab, then
click on the top of the CPU column to list the processes from highest to lowest. Right-Click on the one that says
autopano-win32.exe move your mouse to Set Priority, then click on AboveNormal. You'll get a little warning, just
click OK. It probably won't half the time it takes, but it will definitely speed it up. Selecting High or Realtime
would probably affect other programs and processes you are running so stick with AboveNormal. I'm going to recommend
using this same tip when running smartblend, since it is also a CPU intensive program.
When Autopano is done (it says the PTO file is saved), just click OK, then click the red 'X' on the top right corner
and you will be returned to Hugin. It should bring up the Panorama Preview window with a (hopefully) good looking
pano. Here's what it showed me:
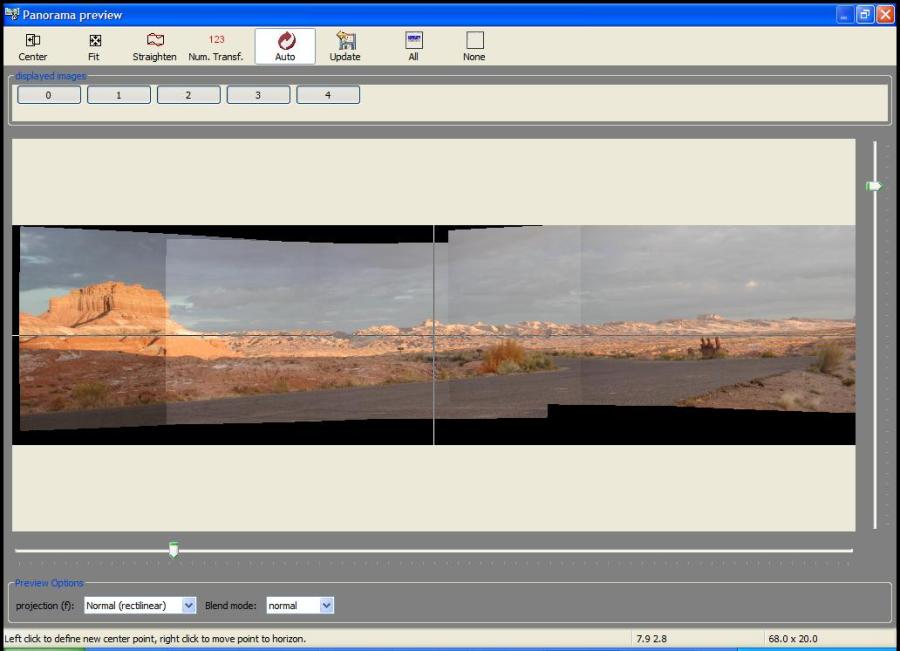
Ok, there are a few useful things in the preview window. First you have buttons on the top for Center and Fit.
These usually do a pretty good job of finding the middle of your pano and cropping down to your pictures. I
haven't had occasion yet to use the Straighten and Numerical Transform buttons, so I can't comment on them. Auto
means it will refresh the preview any time a parameter is changed. Update is used when Auto is deselected and you
want to update the preview. All and None select all or none of your pictures to preview. In the next row you'll
see number corresponding to your pictures. You can click on these buttons to turn on/off the corresponding picture.
This is useful when you want to see how a picture fits in with the rest (sometimes you can get rid of an unnecessary
picture in a large pano). Next you have slider bars on the bottom and right which change the horizontal field of
view (0 - 360 degrees) and vertical field of view (0 to 180 degrees). Last you have pull-down menus for projection
and blend mode. As you can see, the default projection is rectilinear (which is what most lenses use), but I
want cylindrical for this pano. There are a whole lot of new projections in this version of Hugin. I don't know
a whole lot about them, but I have found at least two useful sites:
http://slash72.club.fr/gurl/MODES-PROJECTION/en_prefecture_rectiligne.htm and
http://www.panotools.info/mediawiki/index.php?title=Panorama_formats. It doesn't hurt to just experiment with
the different projections and see which one you like best! When you select Difference from the blend mode, the
overlap between pictures should turn black, or very close to black. When it's all black that means the pictures
are aligned nicely and that color between two pictures is even. In my example you can see the left-most picture
is a little darker than the rest. Luckily Smartblend will compensate for this.
One more thing here, and this is new for version .7, the status bar on the bottom says click left to center the
image and right click to move that point to the horizon. I've found these pretty useful. On this particular image,
I wanted the center just a few more pixels over than what it thought was the center. On a different panorama, I
used the right button to straighten the horizon.
Step 3:
Now close the Panorama Preview window. If you click Create Panorama, it will use enblend to stitch everything
together. You might want to try this to see how it works on your pano. Personally, I like Smartblend better, so
I'll show you how to use it. You can click on Control Points tab to see how well Autopano-sift did at finding
control points. Usually it does great, but sometimes you may need to add your own. Sometimes a horizon will have
a little break in it and I usually go back and add more control points along the horizon. This usually fixes it.
The Optimizer tab is used to certain parameters of you pano. For example, you can optimize the yaw, pitch
and roll of one or more images in your panorama. For more about these parameters and a nice graphic
description of yaw, pitch, and roll go here: http://www.stmuc.com/digicam/.
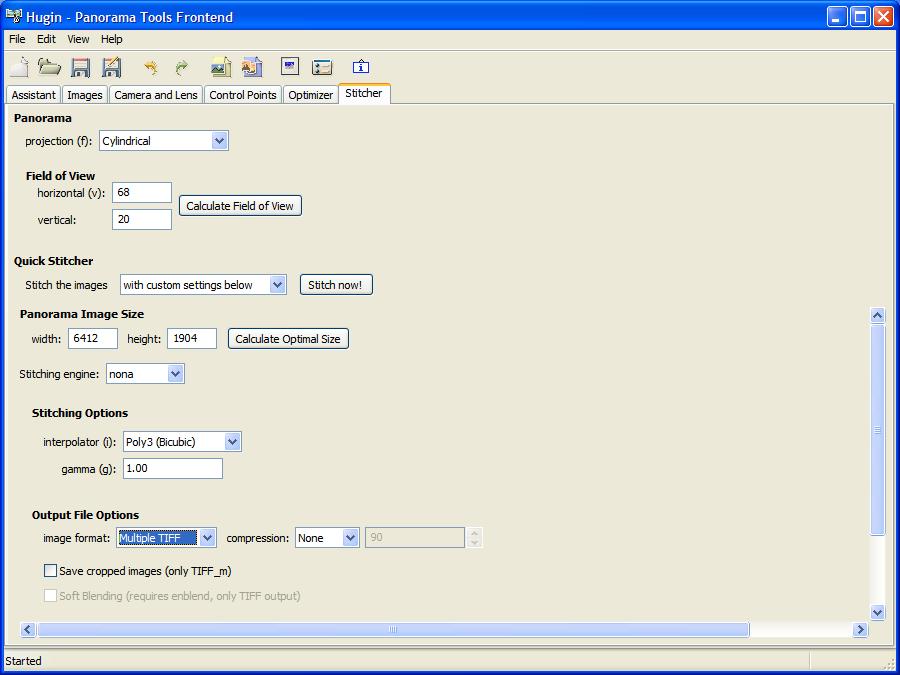
Ok, now click on the Stitcher tab. From Quick Stitcher select "with custom settings below". From Stitching engine
select "nona". Select "Multiple TIFF" not Multilayer TIFF. Select "None" from Compression and
unselect Save cropped images. Here's what my screen looks like now:
Ok, you're ready. Click the "Stitch Now" button and you will be pompted to specify where to save the pictures.
Save them in the same directory as smartblend, wherever it is that you unzipped it. For me it is C:\Program Files\
panorama\smarblend_1_2_3b0. Pick a name that's short and tack an underscore on at the end. In this case I would choose somethinge like
sanrafael_. This part is also CPU-intensive, so you can use the aforementioned trick above to make it go a little
faster.
Step 4:
Now we're ready for Smartblend. First, I'm going to recommend you download a small utility
from Microsoft called "Open Command Window Here". It is one of many so-called Windows XP Powertoys. This little
utility adds an additional option when you click on folders that allows you to open a command window in that folder.
It really saves you a lot of unnecessary typing. You can download it here:
http://www.microsoft.com/windowsxp/downloads/powertoys/xppowertoys.mspx. As I said before, Smartblend is a
command-line utility, which means you have to type to use it, not point and click. So, first you need the command
window. You can get the utility above, use Windows Explorer or My Computer to browse to the folder that contains
Smartblend, right-click on it and select Open Command Window Here, OR you can press the Windows Key + R, type in
"cmd" (without quotes). If you don't do the first option, you'll then need to change directories to the directory
that has smartblend (alternatively, you could put the directory with Smartblend in your PATH, if you know what
I'm talking about). So, now you should see the command window (it's just like DOS for those that remember) to
change directories, I'm going to teach you a most awesome shortcut called TAB COMLETION. At the prompt, type in
"cd c:\". Now, I type in pr and TAB. It automatically fills in the rest of c:\Program Files for me! Now, in my
case, I add a \p + TAB and I keep hitting TAB until I see "c:\Program Files\panorama". Last I add \s + TAB to
get to Smartblend's directory. Ok, we're going to use TAB completion to simplify this next step, too. If you just
type in "smartblend" and hit enter, it will give you some basic information on how to you it. Try it. In our case
we don't need to specify an x or y offsets. So, specify an output file name by using the -o (as in
output) parameter. If we were stitching a 360 degree pano, we would use the -w flag before -o.
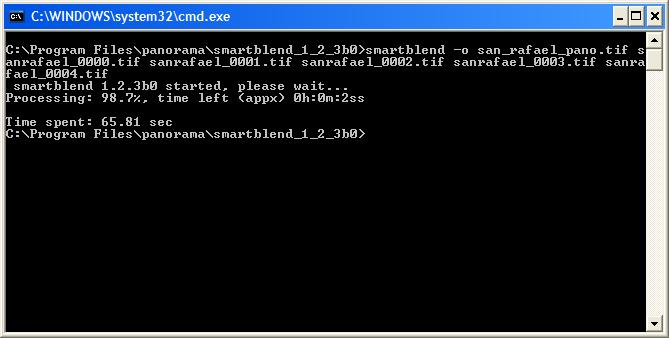
Alright, you just type in: "smartblend -o (think of a good name for your pano).tif" and then all your input files.
You can use TAB completion to type in all your input files. In my case, I just type in "sa" and then TAB and it
completes the rest for me. So enter your input files in order and hit enter. Smartblend is CPU-intensive, so on big
panos, try the trick above for speeding it up. Here's what my command window looked like:
Here's the result, uncropped:

You're almost done! Now just open your favorite image editor and crop the pano down to size. Adjust the
colors/saturation/contrast as you like and have fun with it!
I hope I've helped you get started. I've learned quite a bit since I started using Hugin and have had some great
successes. I want to do another tutorial on how I made a two row 360 degree panorama. It was very tricky to get
it to stitch correctly together, but the result is just beautiful. Here are a few more links to some good resources
out on the web:
